
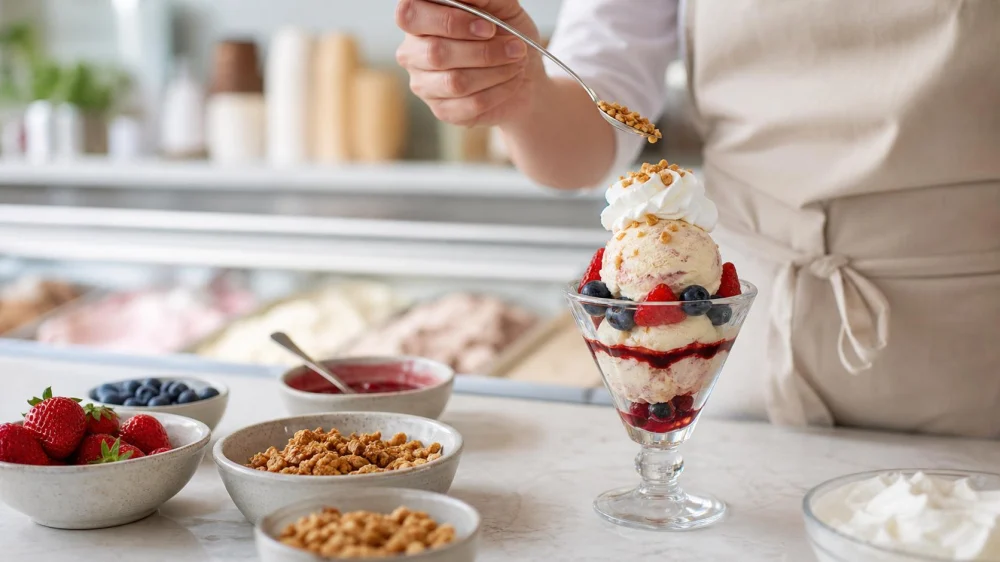
Build a Better Ice Cream Sundae: Layer for Every Bite
Quick answer: Choose one main flavor, one contrasting sauce, one soft accent, and one crunchy topping. Put a little sauce and texture near the bottom, add ice cream in two smaller layers, repeat lightly in the middle, and finish with delicate toppings last. The goal is contrast in every few bites—not the largest possible pile.
A well-built sundae stays interesting from top to bottom. It balances cold and warm, creamy and crisp, sweet and tart, while keeping sauces from pooling and crunchy ingredients from turning soggy too soon.
1. Choose One Flavor Goal
Name the sundae in plain language before selecting ingredients: chocolate-peanut, berry-vanilla, coffee-caramel, tropical-coconut, or tart-cherry. This makes it easier to say no to toppings that are individually appealing but compete together.
Use a simple balance: a main ice cream, a supporting or contrasting flavor, one sauce, one fresh or chewy component, and one crunch. A second sauce or topping should solve a missing contrast, not merely fill space.

Polar Cub Ice Cream / polar cub ice cream
Readington TownshipHunterdon CountyNew Jersey
380 US-22, White House Station, NJ 08889, USA
2. Match the Cup to the Portion
A wide bowl offers easy mixing but lets ice cream warm faster. A narrow sundae glass displays layers and keeps them close, but it needs a long spoon. A lidded cup helps with transport but can compress tall garnishes.
Choose the vessel before scooping. Leave headroom for sauce and toppings, and keep the base broad enough that the dessert will not tip. A modest cup makes two or three distinct layers easier than an oversized bowl.

Big Dipper / the big dipper lbi
Surf CityOcean CountyNew Jersey
1501 Long Beach Blvd, Surf City, NJ 08008, USA
3. Start With a Small Base Layer
Add a teaspoon or two of sauce, crushed cookie, cake cube, fruit compote, or toasted crumbs at the bottom. This creates a final bite worth reaching without turning the base into liquid.
Avoid a deep pool of hot sauce, fresh juice, or thin syrup. It can melt the first scoop and make the dessert difficult to carry. If using a brownie or cake base, cut bite-size pieces so the spoon can reach them without levering against the glass.
4. Use Smaller, Stable Scoops
Two or three smaller scoops create more surfaces for thin layers than one giant sphere. Place the first scoop firmly but do not crush the base. Add a modest middle layer, then the next scoop.
Combine no more than two or three ice cream flavors unless the portions are tasting-size. Pair a strong flavor with a quieter one: dark chocolate with vanilla, espresso with sweet cream, or tart fruit with yogurt-style frozen dessert. Similar intensities can blur together.
5. Control Sauce Temperature and Amount
Warm sauce should be fluid, not steaming. Let very hot fudge, caramel, or fruit sauce cool enough that it will not immediately collapse the scoops. Cold, thick sauce may need a short stir or gentle warming according to its instructions.
Apply a thin ribbon between scoops and a smaller finish on top. This distributes flavor better than pouring the full amount over the crown. Taste the ice cream first; a very sweet base may need tart fruit or salt contrast more than additional syrup.
6. Prepare Fruit for Clean Bites
Wash and dry fresh fruit, remove stems or pits, and cut pieces small enough for the spoon. Dry surfaces matter: excess water can form icy patches and dilute sauce. For macerated or cooked fruit, drain or portion syrup deliberately.
Place sturdy pieces such as diced mango, cherries, or berries between layers and save the prettiest pieces for the top. Very watery melon or frozen solid fruit can disrupt texture; bring frozen fruit to an appropriate biteable state before serving.
7. Protect Crunchy Textures
Toasted nuts, cookie crumbs, waffle pieces, cereal, brittle, and cacao nibs soften when buried in wet sauce. Put a small amount in the middle for discovery and most of it at the top immediately before serving.
Match crunch size to spoon size. Large hard candy or whole cookies are decorative but awkward to eat. Crush them into predictable pieces, while keeping sharp shards and choking risks away from young children or anyone who cannot manage them safely.
8. Add the Finish in the Right Order
Finish with whipped cream or a lighter topping, then drizzle, then dry crunch, and finally a small garnish. A cherry, berry, mint leaf, citrus zest, or one cookie can signal the flavor without hiding the sundae.
Put delicate wafers and crisp cones on at the last moment. Keep heavy toppings low or supported so they do not roll off. If the dessert needs a lid, reduce height and pack brittle elements separately.
9. Handle Dietary Needs Before Assembly
Check labels and shop information before ingredients share a surface. Dairy-free, vegan, gluten-free, nut-free, and sugar-free describe different needs and are not interchangeable. Sauces, cookies, brownie pieces, whipped toppings, cones, and decorative candy may introduce ingredients not obvious from the ice cream name.
For a food allergy, ask about recipes, shared scoops, topping bins, blenders, and cross-contact before ordering. Build that person’s sundae first with clean tools and verified ingredients when the shop can support the process. If safety cannot be confirmed, choose a simpler sealed option or skip the order.
10. Serve Before the Texture Changes
Chill the empty bowl briefly if practical, prepare toppings first, and scoop last. Serve immediately with the right spoon and a napkin. For a group, assemble one layer across all bowls before moving to the next so portions stay consistent, but keep finished sundaes cold.
Do not leave assembled dairy desserts at room temperature for extended periods. Discard leftovers with an uncertain time-temperature history rather than refreezing a melted sundae. A sundae is designed for immediate texture, not long storage.
Layering formula: small base accent; first scoop; thin sauce or fruit; second scoop; light sauce; whipped finish; dry crunch; fresh garnish. Adjust portion and ingredients to the diner rather than forcing every layer into every order.
This article provides general serving ideas. Follow product labels and current food-safety guidance, and ask the shop directly about ingredients and cross-contact when dietary needs or allergies matter.

 Dairy Queen (Treat)4.0 (442 reviews)
 Praline's Ice Cream of Plainville, CT4.0 (335 reviews)
 Amorino Gelato4.0 (997 reviews)
 Dairy Queen (Treat)4.0 (403 reviews)
 Brunswick Cream4.0 (56 reviews)
 Smoothies On 7 Mile Dairy Bar4.0 (561 reviews)
 What Is Margarita Ice Cream and How to Add Tequila and Salt
 What Is Neapolitan Ice Cream and Why the Three Flavors Together
 Why Ice Cream is the Perfect Dessert for Every Season
 How to Make Ice Cream with Feijoa for a New Zealand Pineapple Guava Twist
 What Is Carrot Cake Ice Cream and How to Add Cream Cheese Swirls
 Ice Cream and Sustainability: How Brands Are Reducing Environmental Impact